Sync User Profile Data via CSV
Daily updates of user data via CSV file
To use this method, prepare and maintain a CSV file with unique user IDs and additional data, and upload it nightly (recommended). When the data is uploaded, it's synced with Experience OS audience conditions according to a JSON schema you'll prepare for this purpose. Then, the marketing team can create audiences using these targeting conditions.
Onboarding overview
The onboarding process includes the following steps:
- Step 1: Prepare the file and folder.
- Step 2: Create a new source and get credentials for your user profile data feed in Experience OS.
- Step 3: Prepare the schema (can also be done in advance).
- Step 4: Define the identifier and other file attributes during the onboarding process.
- Step 5: Upload the data, validate, and save.
Step 1: Prepare the file
Use the following guidelines:
| File type | CSV |
| File format | UTF-8 encoded. If using non-Latin characters (Russian, Japanese, and so on), use UTF-8 with BOM. |
| File name | CRM_data.csv |
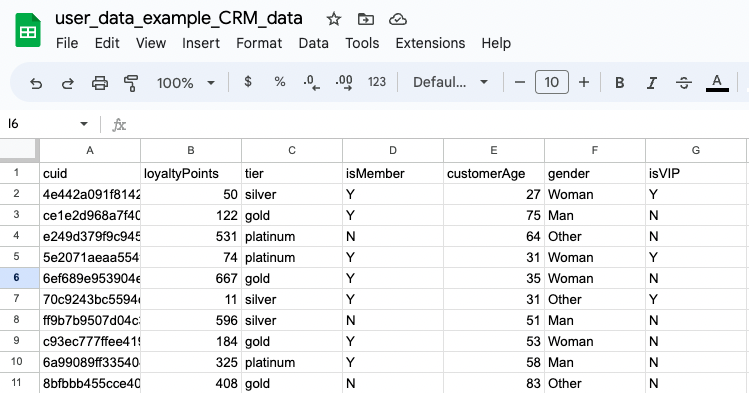
| Columns | ➜ The first column is the identifier and is mandatory. This can be the CUID or an external ID. Learn more about selecting an identifier in the next section, Determine the common identifier. ➜ Additional columns are any attributes that are meaningful to your business. You can add up to 1,500 columns. Note: For privacy reasons, do not include any attributes that are considered PII (such as name, date of birth, address, and so on). |
| Attribute formats | String, Number, Date, Array, Boolean |
| File size | Up to 100 MB. If your file exceeds this limit, see Large file handling later in this article. |
Sample CSV file
Determine the common identifier
Each user record must include a unique identifier, to match between an online user and the attributes you defined for your sync. Supported values include Hashed Email, DYID, or Other (you define it). We recommend using hashed email addresses (SHA256 hash of a lowercase email address). For privacy reasons, do not use plain text PII (such as name, phone number, or email address) as the identifier.
Make sure that all your identification events, including Identify, Login, Signup, and Newsletter Subscription use the same identifier.
Step 2: Create a new source
-
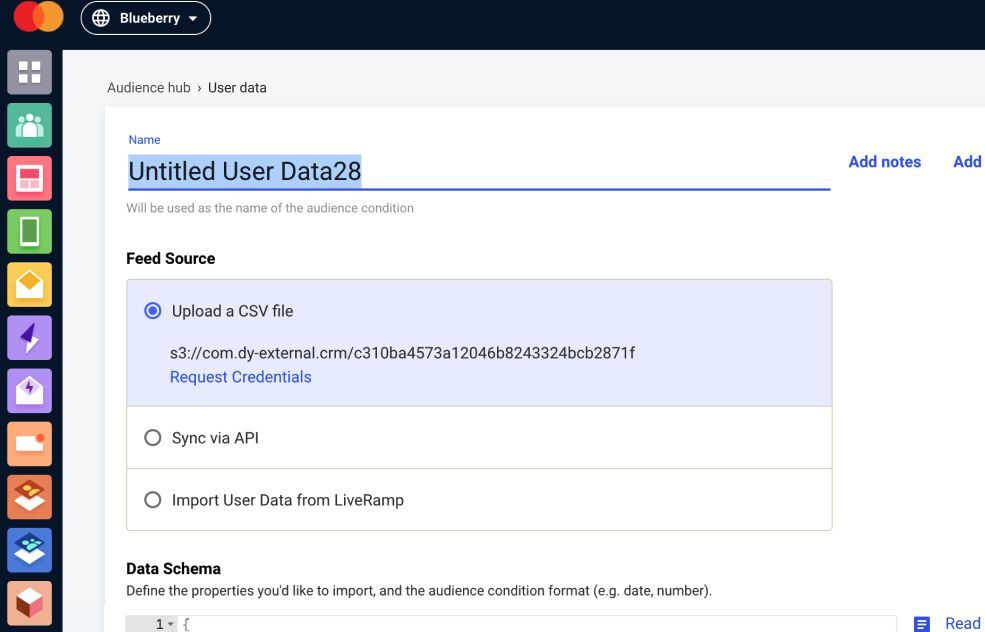
In Audiences › Extensions › Profile, click Add Source. The Edit User Data page appears.
-
Enter a name for the feed. The name of your User Data Profile feed will be the name of the audience condition you use later to create an audience. You can name the feed whatever you want.
-
Optionally, add notes or labels.
-
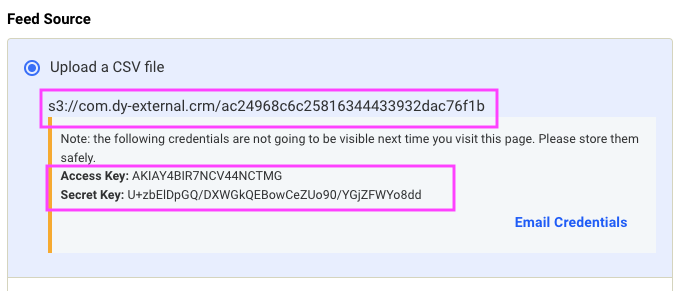
Select Upload a CSV file as your feed source, and then click Request Credentials to get credentials for an AWS S3 bucket. Copy and store the credentials for future reference. Make sure to save both the path and the key information. Click Email Credentials to send yourself the credentials by email.
Step 3: Create the schema
Use the User Data Schema Creator to create or modify your schema. The schema is JSON code that's used to sync the user data to a User Data feed in Experience OS. The schema takes the information in the CSV file and "translates" it into the corresponding condition types and operators in the audience creation process. The attributes you define in the schema then appear in your audience targeting conditions.
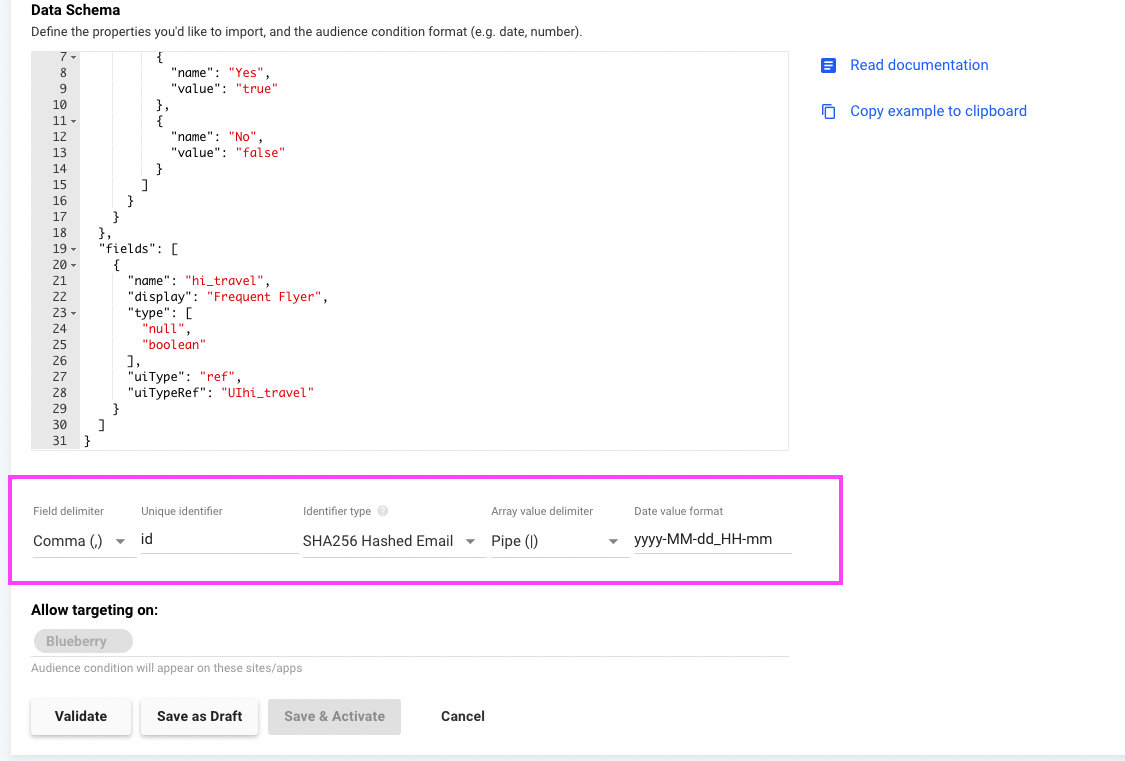
When you complete your schema in the schema creator tool, copy the code into the Data Schema field in the feed settings.
Step 4: Set the identifier and other file information
| Field | Description |
|---|---|
| Field delimiter | The character that splits the data or text into separate fields. Default: Comma (,) |
| Unique identifier | The name of the column with the users' IDs. Default: id |
| Identifier type | The identifier type, as determined in Step 1. Supported values: SHA256 Hashed Email, DYID, Other Default: SHA256 Hashed Email If you select the identifier type Other, specify the type in the Custom Identifier field that appears. |
| Array value delimiter | A character that separates the values of an array within a field. Default: Pipe (|) |
| Date value format | Define a format for dates in your file and feed. Default: yyyy-MM-dd-HH-mm |
If you have more than one Dynamic Yield section, you can add section names in the Allow targeting on field to use these targeting conditions on them as well. Note that this means that all data synced to this feed on Dynamic Yield is shared with the allowed sections listed here. Also, the feed can be edited only in the original section.
Step 5: Upload the data
The upload should include only one file. If your file exceeds 100 MB, you must split it into multiple files and follow the large file handling instructions in this article.
To upload the CSV file, you must again go "off site", and access your designated S3 bucket. The path is the one generated in step 2, with your folder name, like this:
s3://com.dy-external.crm/Bucket_Id/Folder name (AWS US)
s3://dy-eudc-external-crm/Bucket_Id/Folder name (AWS EU)
Example:
s3://com.dy-external.crm/ac24968c6c258114dac148ab/upload_2021-02-28_00-03
Make sure the folder that contains your upload file follows this name format:
“upload_YYYY-MM-DD_HH-mm” (for example, upload_2021-02-28_00-03)
! The date in the folder name must be within a ±30‑day window from the current date
Now, go back to the Edit Data Feed page in Experience OS, and click Validate.
Preview your data, and if everything is as expected, click Save and Activate.
Now, the data is processed by Dynamic Yield. Upon completion, the relevant conditions appear in your Audience Manager. The targeting by audience conditions begins immediately, but reports can take up to 24 hours to process.
Upload frequency
It's important to update the data frequently. This ensures that targeting is up to date. When your data is not the latest, users with changed CRM data might not be targeted for relevant experiences, and users who were recently added to the CRM don't match any conditions.
If the feed is not updated for more than 10 days, an alert appears on your dashboard.
If the feed is not updated for a year, all data is deleted. This is due to GDPR regulations.
Large file handling
The maximum supported file size is 100 MB. If your file is larger than 100 MB, split it into multiple files of about 40 MB, making sure the following is true:
- The structure of all the files is identical.
- The files don't duplicate users.
You'll upload the files to the same daily folder. The LAST file name must be CRM_data.csv (same as the single file standard upload described earlier). This is the file that triggers the ingestion of the data in the folder, which is why it must be added last.
The other files can be named anything, though we recommend keeping a consistent naming scheme. For example:
- CRM_data_part_1.csv
- CRM_data_part_2.csv
- CRM_data_part_3.csv
- ...
- CRM_data.csv (last file, triggers the ingestion)
Share user data between sections
You can share the data feed across sections. This is especially useful when maneuvering between staging and production environments, or if your traffic migrates between multiple properties managed under the same Dynamic Yield account.
To enable data sharing, locate the Allow targeting on option after the data schema settings. By default, it is pre-populated with the name of the current section. If you want to share the data with an additional section, click the field and select the relevant section from the dropdown menu.
Note that after the data is shared, the feed can only be edited from the original section.
Updated 3 months ago