Server-Side Cookies
Implementing first-party cookies to resolve third-party cookie browser restrictions
Privacy concerns are at an all-time high, and browsers have begun enforcing limitations on third-party cookie functionality. In 2019, Safari started forcing a 7-day expiration for third-party cookies, and Firefox started blocking them by default. In Q1 of 2024, Google Chrome started blocking third-party cookies by default for 1% of its users, increasing to all users in H2 of 2024.
How does this affect you?
Without third-party cookies to identify them, visitors are considered new users. In Safari this happens 7 days after the most recent visit, and if cookies are completely blocked, the visitor is considered a new user upon every pageview. The implications can be significant: An inflated number of users, broken variation stickiness in A/B testing, detached historical data, and more.
To overcome this limitation, you must serve the DYID cookie from your server, making it a first-party cookie that is not affected by the new restrictions.
How to serve the DYID cookie from your server
The DYID cookie must be set by the backend application serving your website on your domain. Cookies set this way are considered first-party cookies, and are therefore not affected by restrictions and can have a longer expiration period. Set this up in the code as follows:
- Check whether the visitor arrives at your site with a DYID cookie (is a returning user).
- If so, duplicate the cookie with a new name (_dyid_server), and set its expiration date to 1 year.
Example:
Let’s say the value of the _dyid cookie is 7237284912004766755. Duplicate the cookie value into a new cookie, _dyid_server, and set the expiration to 1 year by setting 31556951 as the max-age attribute value.
The result is the following cookie: _dyid_server=7237284912004766755;max-age=31556951;domain=.example.com;path=/;secure
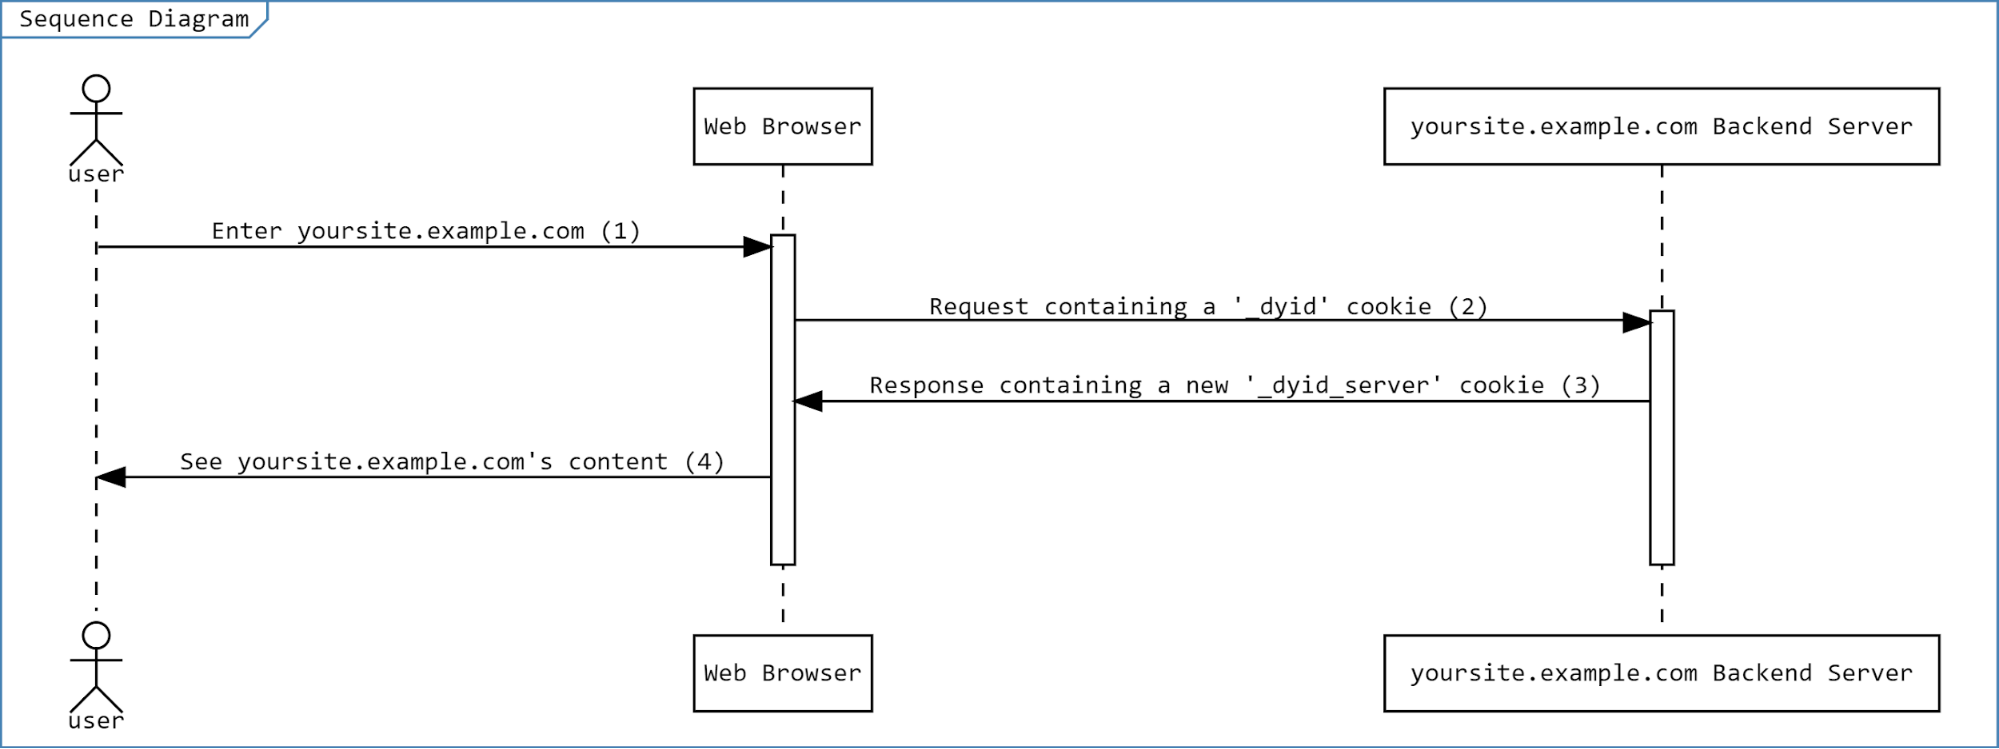
Here's a flow of this solution:
- A user enters your website.
- Your server (backend application) gets a request to return a web page from the browser. Requests from returning users include the _dyid cookie.
- Your application server performs the following steps:
- It checks whether the request includes a _dyid cookie.
- If the _dyid cookie is found, it duplicates it as a new _dyid_server cookie.
- It then returns the new cookie as a response header, with a 1-year expiration date.
This sets it as a server-side first-party cookie in the user's browser, which is not affected by the cookie expiration enforcement.
(Note that the _dyid cookie continues to be returned, this should not change).
- Our script now uses the _dyid_server cookie as it runs on your page, and your user sees the rendered content of your website.
This way, no returning user data is lost, even if the user hasn't visited your site in more than 7 days.
Note that if you have enabled Active Cookie Consent mode, it's important to wait for the consent object and act upon its result. Otherwise, you might write cookies for opted-out users.
Code examples
Here are some sample code snippets for commonly used platforms and programming languages.
cURL
>>> curl -v http://yoursite.example.com --cookie "_dyid=-3233584359067736988"                                                                                                                                                                                                                                                                                        19:55:13
*   Trying 172.217.18.4...
* TCP_NODELAY set
* Connected to yoursite.example.com (172.217.18.4) port 80 (#0)
> GET / HTTP/1.1
> Host: yoursite.example.com
> User-Agent: curl/7.64.1
> Accept: */*
> Cookie: _dyid=-3233584359067736988
>
< HTTP/1.1 200 OK
< Date: Mon, 30 Mar 2020 16:55:16 GMT
...
< Content-Type: text/html; charset=ISO-8859-1
...
< Set-Cookie: _dyid_server=-3233584359067736988; expires=Wed, 29-Apr-2021 16:55:16 GMT; path=/; domain=.example.com; Secure
NodeJS (using Express and CookieParser)
// need cookieParser middleware before we can do anything with cookies
app.use(express.cookieParser());

app.use((req, res, next) => {
  if (req.cookies._dyid) { // if this is a returning user and the DYID cookie exists
    const dyid = req.cookies._dyid;
    res.cookie('_dyid_server', dyid, { // store a new server-side cookie named "_dyid_server" with the DYID value
      expires: new Date(Date.now() + 31540000000), // 1 year expiration
      domain: '.example.com', // make cookie available to all subdomains
      secure: true                                 // only sent over HTTPS
    });
  }
  next();
});
Python (using Django)
# Check if the user has a DYID cookie
dyid_cookie = request.COOKIES.get('_dyid')

if dyid_cookie:
    # Set a server-side cookie with the same value, valid for 1 year (in seconds)
    response.set_cookie(
        key='_dyid_server',
        value=dyid_cookie,
        max_age=31557600,       # 1 year
        domain='.example.com',   # available to all subdomains
        secure=True              # only sent over HTTPS
    )
PHP
<?php
if (isset($_COOKIE['_dyid'])) {
    // If this is a returning user and the DYID cookie exists
    $dyid_cookie = $_COOKIE['_dyid'];

    // Set a server-side cookie named '_dyid_server' with the same value, expiring in 1 year, for all subdomains, sent only over HTTPS
    setcookie(
        '_dyid_server',
        $dyid_cookie,
        time() + 31557600,  // 1 year
        "/",                 // path
        ".example.com",      // domain
        true                 // secure
    );
}
Technical validation
This procedure checks that the _dyid_server server-side cookie is created with the same value as the _dyid cookie, but with a 1-year expiration date. It can be done on any browser, but we used Chrome in this example:
- Open a new Incognito browser window.
- Open Chrome developer tools (Command+Option+J (Mac) or Control+Shift+J (Windows, Linux, Chrome OS)).
- Navigate to any page on your website that has the Dynamic Yield script.
- Go to the Network tab. Select Preserve Log and then refresh the page.
- Search (🔍) the logs for
set-cookie: _dyid_server - Verify that the number of _dyid_server is the same as the value of _dyid, as returned in the developer tools console.
- Click the search result, and verify that the set-cookie header directives are set correctly:
Domain with.yourdomain.com
Path with/
Secure (with no value)

This validation cannot be done in the Application Tab › Storage › Cookies area because this area includes both server-side and client-side cookies, so some of these will be automatically deleted by Safari.
The Mastercard Dynamic Yield Chrome Extension
Because Google is phasing out support for third-party cookies, some Dynamic Yield features for editing, previewing, and debugging content on your site might not function properly. If you are working with the Dynamic Yield script, you must install our Chrome extension to overcome these restrictions. Learn more
Updated 6 months ago