SAP Hybris
The Dynamic Yield SAP Hybris integration is a quick and seamless way to implement Dynamic Yield. The integration takes care of the basic implementation of Dynamic Yield on your site (script, page context, e-commerce events, and product feed). Part of the setup requires technical knowledge of SAP Hybris.
Prerequisites
- SAP Hybris version 1905 or higher.
- Standard Spring MVC/JSP/JS SAP Hybris application (Spartacus and Angular are not supported).
Implementing Dynamic Yield on SAP Hybris
Step 1: Create a Dynamic Yield section
A section in Dynamic Yield Experience OS represents your store's site in our system. Each section has an associated product feed, which is your product catalog. You'll configure the sync of the catalog/feed in the following steps.
To create the section, go to Experience OS and follow the directions in our support site article, Managing Sections.
Step 2: Install the Dynamic Yield extension
- Download the extension files and save them locally.
- Copy the folder into your root project to /hybris/bin/custom/dynamicyieldintegration. Push the folder to your repository to allow us to access the files for future updates.
- Include the addonsupport extension in your localextensions.xml
<extension name="addonsupport"/> - Include the extension in your localextensions.xml
<extension name="dynamicyieldaddon"/> - Install the extension by using the following command:
ant addoninstall -Daddonnames="dynamicyieldaddon" -DaddonStorefront.<storefrontTemplateName>="Storefront1"Storefront1is the name of your storefront, andstorefrontTemplateNameis the template name you are using - Rebuild the SAP system by running
ant clean allfrom the hybris/bin/platform directory.
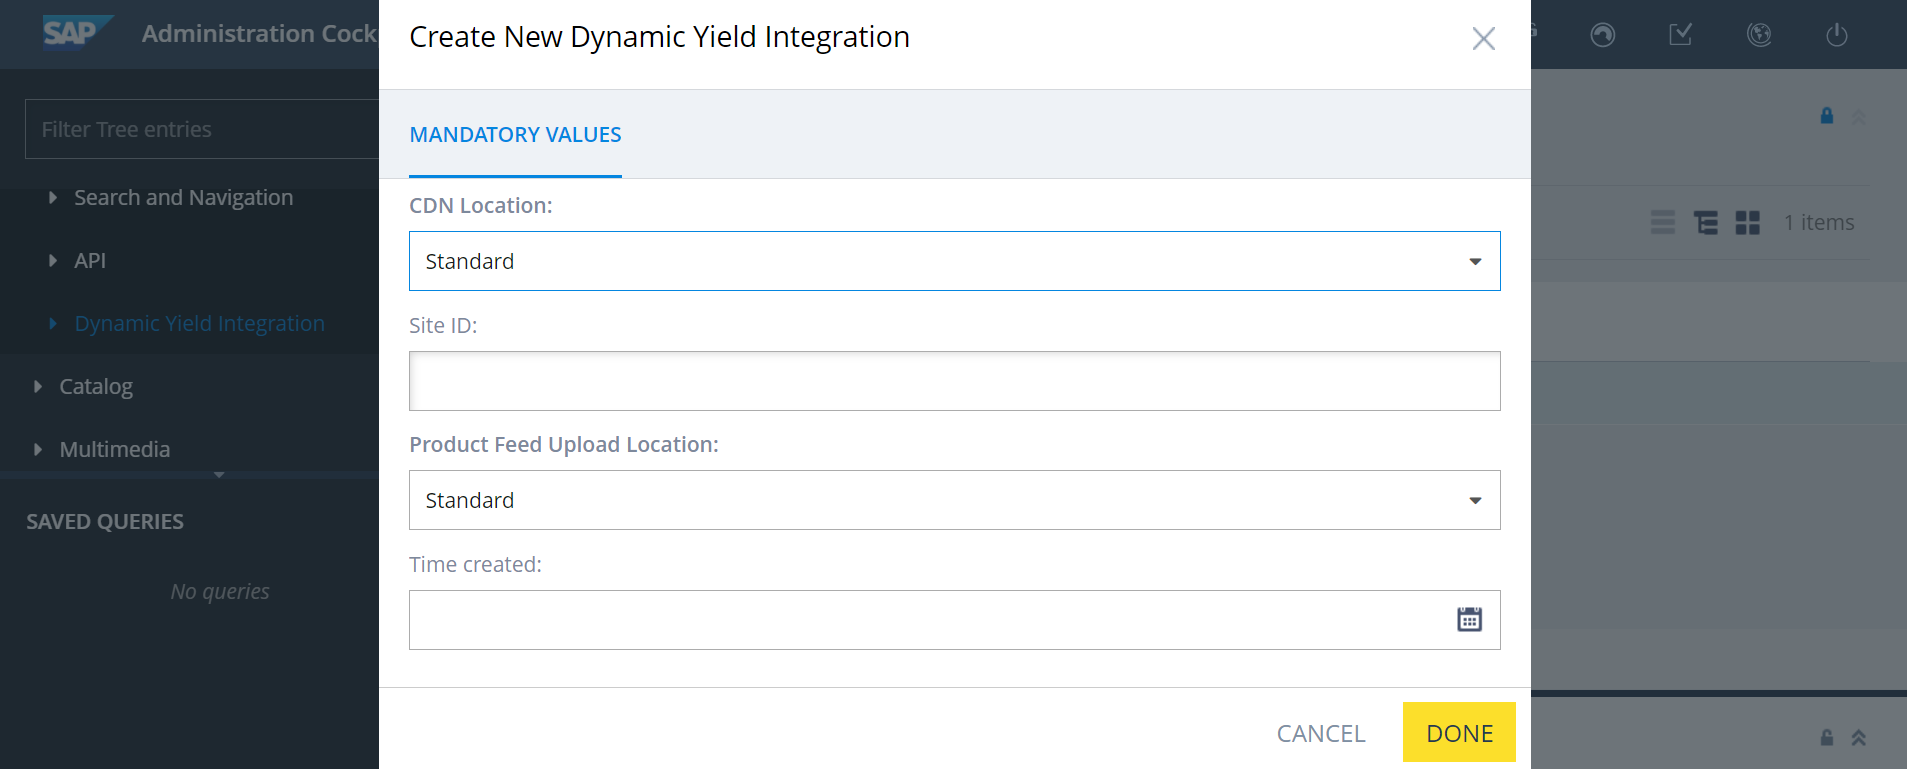
Step 3: Enter the basic settings
-
Restart your SAP Hybris server and update the platform.
-
In SAP Hybris, go to Backoffice › Administration Cockpit › System and open Dynamic Yield Integration.
-
Create a new item in Dynamic Yield Integration by clicking +.
-
Enter the Site ID of your Dynamic Yield site.
-
If you are connecting to Dynamic Yield through our EU data center, select Europe as the CDN location and Product Feed Upload Location.
-
-
Edit the item you just created and add the following attributes:
-
The Product Feed’s S3 Access Key ID and Secret Access Key.
-
Define the Sync rate of the Product Feed (default is 1 day).
-
If you are using a custom CDN, specify the CDN Location and CDN Location Custom URL.

-
Step 4: Add the Dynamic Yield script to your site
The Dynamic Yield script is implemented within the Dynamic Yield extension, but needs to be included in the implementation of your storefront as follows:
- Open the file that contains your main tags in your storefront extension. By default, this is master.tag.
- Include the
taglibreference:<%@ taglib prefix="dynamicYieldIntegration" tagdir="/WEB-INF/tags/addons/dynamicyieldaddon/responsive" %> - Add the main Dynamic Yield tag file as the first element within tag:
<dynamicYieldIntegration:dynamicyieldintegration />
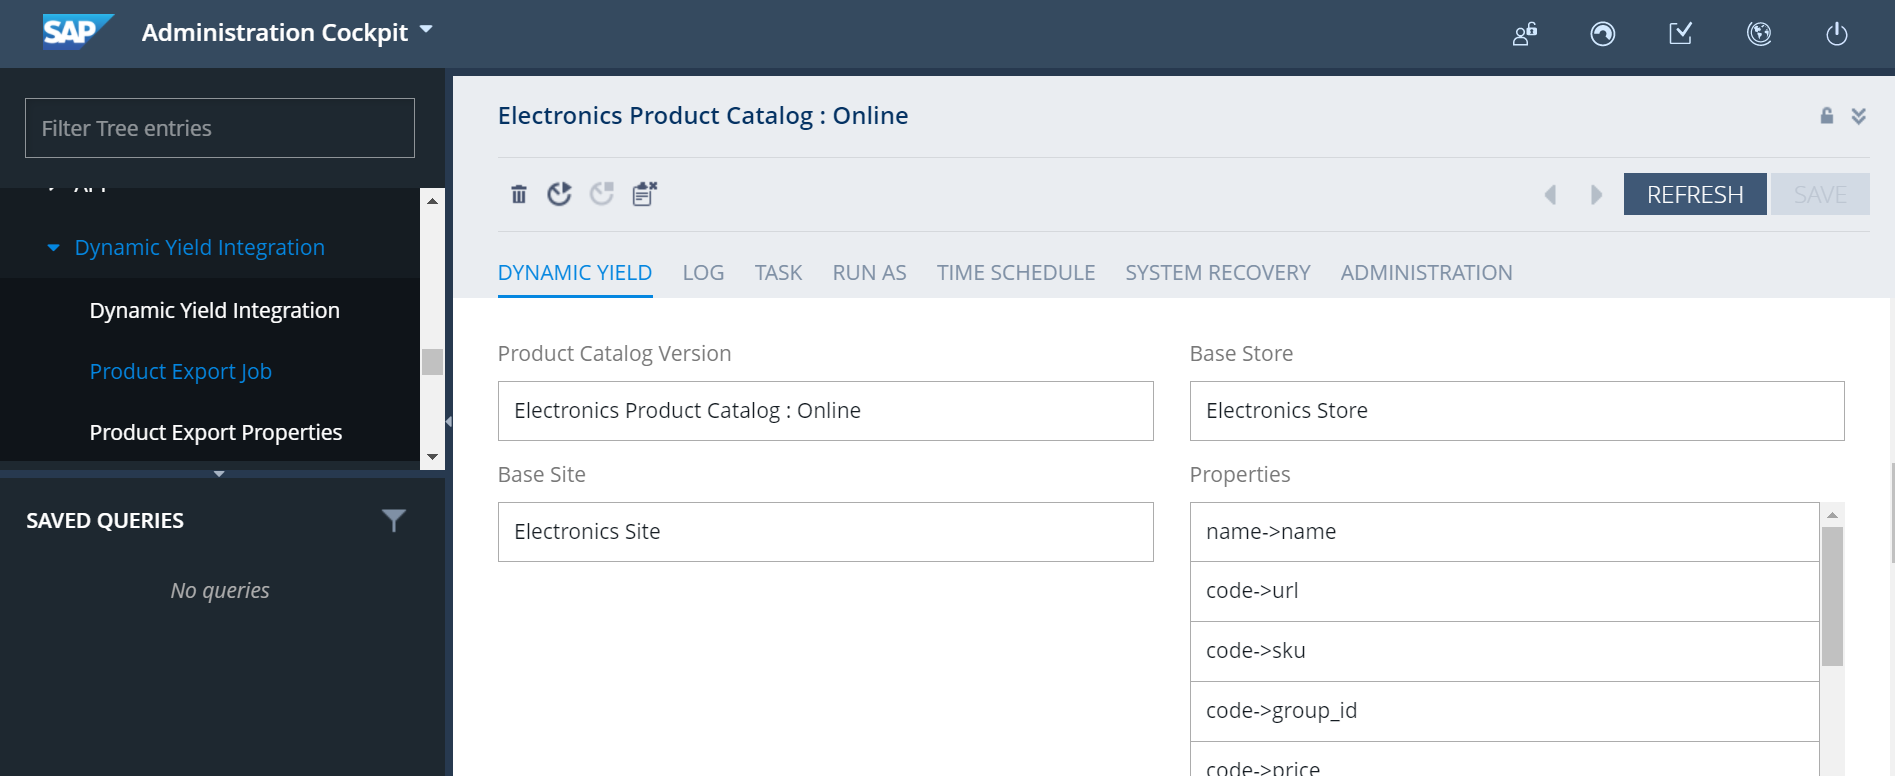
Step 5: Define the product feed export job
Define values for the properties that define your product catalog, base store, base site, and properties.
-
Go to Backoffice › Administration Cockpit › System › Dynamic Yield Integration › Product Export Job.
-
Replace the values in the following settings:
- Product Catalog Version: Products from this catalog version will be exported.
- Base Store: Base store of the products that are exported.
- Base Site: Base site of the products that are exported. Its property UID will be used in identifying the URL of the product and product image.
- Properties: Product properties that will be exported.
Step 6: Validate base site URL properties
Make sure that one property exists for every base site that is using Dynamic Yield. The properties must exist in the .properties file. By default, this is located in local.properties in the config folder of your project.
The format of the properties must be website.{Base Site UID}.https. For example:
website.electronics.https=https://electronics.local:9002/dynamicyieldintegrationstorefrontStep 7: Validate your implementation
Verify that the implementation has been configured correctly in Settings › General Settings › Implementation Status. For more details, see Validating Your Web Implementation.
Technical details
The following sections contain details about how the extension handles page context, events, and the export job. No action is needed on your part, unless you have customized your implementation of SAP Hybris and need to customize the extension.
Page context
The extension automatically adds the Page Context API to each of your pages via the extension’s dynamicyieldcontextapi.tag file. SAP Hybris adds this to the main <head> tag of your pages by default.
- Homepage API: Placed in pages where the
pageBodyCssClasseshas a classpage-homepage. - Category Page API: Placed in pages where the
pageBodyCssClasseshas a classpage-CategoryPage. - Product Page API: Placed on pages that have the product attribute within the model. This attribute is filled in the model in the backend controller of Hybris, only on product detail pages. By default, this is done in ProductPageController.java.
- Other Page API: Placed on all pages that don't match any of the conditions for the other page types.
Events
The Dynamic Yield event API calls are automatically implemented by the extension. The data bindings are done in dynamicyieldjsvariables.tag, and the event logic is implemented in dynamicyieldaddon.js.
There are twelve events:
Purchase
This event is fired when a visitor purchases a product by completing the last step in the checkout process, after which they are redirected to the order confirmation page.
All the necessary data is taken from orderData attribute from the model, on the order confirmation page. By default, this attribute is filled in AccountPageController.java.
This event triggers in one of the following cases:
- There is a
DIVelement with the classplace-order-formand a form within it that is submitted. - There is a
FORMelement with the classplace-order-formthat is submitted.
Additionally, when the customer is redirected to order confirmation page, the class page-orderConfirmationPage should be present on the page.
Add to Cart
This event is fired every time the customer successfully adds a product to cart. It may occur on three types of pages by default:
- Product Details Page (Add to Cart button)
- Category Page (Add to Cart button next to a product)
- Search Results Page (Add to Cart button next to a product)
Technically, the event triggers when any FORM with the class add_to_cart_form is submitted.
The data binding on the product details page is done from the product attribute from the model (ProductPageController.java) as well as from the cartData attribute from the model (custom DynamicYieldControllerAdvice.java). Additionally, quantity is taken from the frontend element with the class js-qty-selector-input.
The data binding on other pages is done from the front-end elements.
- For
productCode,INPUTwith the attributename ="productCodePost"is used. - For
productPrice,INPUTwith the attributeinput[name ="productPostPrice"is used. - For
productCurrency, theMAINelement is used with theattribute data-currency-iso-code.
Signup
This event is fired upon visitor registration to the site as defined in the following scenarios:
- User successfully registers and
FORMwith the ID#registerFormis submitted. - User is automatically logged in.
The data (hashed user email address) is taken from DynamicYieldControllerAdvice.java.
Login
This event is fired every time the visitor logs into the account. This is when the FORM with the ID #loginForm is submitted, and the user successfully logs in.
The data (hashed user email) is taken from DynamicYieldControllerAdvice.java.
Newsletter Subscription
This event is fired every time the visitor signs up for a newsletter. Technically, this is when a LABEL that has a FOR attribute with the value MARKETING_NEWSLETTER and a class toggle-button__switch is turned on.
In Hybris, by default, this occurs in the example Consent Page (My Account › Consent Management), when the visitor turns the example context element to true.
The data (hashed user email) is taken from DynamicYieldControllerAdvice.java.
Remove from Cart
This event is fired every time a visitor removes an item from the cart.
The data binding is done on the Cart page.
The event is triggered when the user clicks the LI element with the class js-execute-entry-action-button on a Cart page (remove from cart button).
- Product ID is taken from the
data-entry-product-codeelement within theLIelement. - Quantity is taken from the
data-entry-initial-quantityelement within theLIelement. - For productCurrency,
MAINelement is used with the attributedata-currency-iso-code. - The other values are taken from the
cartDataattribute in the model.
Sync Cart Content
This event is fired every time the visitor starts a new session. For this, sessionStorage is used with custom attributes.
Data binding is done from the cartData attribute in the model.
Sort Items
This event is fired every time a visitor changes the sorting options on a product listing page (category page).
The event is triggered when the FORM with the ID sortForm1 or sortForm2 (top and bottom commerce sorting forms) within the DIV element with the class sort-refine-bar is changed (select box element within it is changed).
The data is taken from the select box elements. In default commerce accelerators, the select boxes are filled with SolrSort item values. Based on whether the item in its code contains -asc or -desc, the sorting is done in ascending or descending order. This logic is also checked in the event, and based on that, the sortOrder is filled.
sortBy is taken from the value of the selected option within the form (select box).
Filter Items
This event is fired every time a visitor filters the items on a product listing page (category page).
The event is triggered when the checkbox with the class js-facet-checkbox within the DIV element with the class js-product-facet is marked.
Data binding is done from the searchPageData attribute within the model, filled in AbstractSearchPageController (searchPageData.facets).
facetElement is the element closest to the triggered checkbox, which has a class js-facet. Then, filterType is taken based on this element and all facet codes.
filterStringValue and filterNumericValue are taken from the element with the class facet_list_text.
Change Attribute
This event is fired every time a visitor filters the items on a product listing page (category page).
This event is fired every time a visitor changes a product attribute on a product page. By default, this can occur in two scenarios:
- A visitor clicks the picture icon of a different variant (for example, style). The event in this scenario is triggered when the user clicks the
LIelement within aDIVthat includes the classvariant-selector. - A visitor selects a different variant in the selection box (for example, size). The event in this scenario is triggered when the selection box with the class
variant-selectis changed.
The data binding is done from the product attribute within the model (product.baseOptions).
Promo Code Entered
This event is fired every time a visitor successfully uses a promo code (cart page).
The event is triggered when the INPUT with the ID js-voucher-code-text within the FORM with the ID applyVoucherForm is submitted, and the code is applied successfully (parent element of the element with the class js-voucher-validation-container does not have the class has-error).
Promo code is taken from the voucher element itself (input text with the ID js-voucher-code-text).
Search
This event is fired every time a visitor runs a free-style keyword search.
The event is triggered when the FORM with the NAME attribute search_form_SearchBox is submitted.
Search text is taken from the element with the ID js-site-search-input.
Exported product properties
The following properties are included by default for each product in the product export job. The item is of type DynamicYieldExportProperty.
- sku: The product's unique identifier.
- name: The product's name.
- url: The URL to the product details page.
- group_id: Identifies a group of products that differ in some product attributes.
- price: The product price.
- in_stock: Indicates that the product is in stock.
- categories: The categories associated with the product, from general to specific.
- image_url: The URL to the product image.
- keywords: Any additional information describing the product, separated by pipes.
You can include additional properties by creating them in ProductExportJob.properties and filling in the value. If the value provider must be used, it should be written in the same way the current providers are and referenced within the spring configuration.
The following attributes are included within each of the listed product properties:
- Product Property name: Represents the property name from the product. This name is relevant only if the mapping of the property Product - Dynamic Yield is done 1:1. This means that the value of this product property will be mapped directly to the Dynamic Yield property. In all other cases, this attribute is irrelevant.
- DY Property name: Represents the Dynamic Yield property name.
- Export activated: This determines if the property will be included in the export.
- Is Multi-Language: This determines if the property is multi-language. If it is, it will be exported for every language in the system that is Active (both in the header and the value row of the export CSV file).
- Is Mandatory: This determines if the property is mandatory for the export. If the value is true, product will not be exported if this property is empty (null or ““).
- Value Provider bean ID: This contains the ID of the value provider bean that provides the custom logic for exporting the property. If this field is not empty, the specified value provider bean will be used. Since all properties have to be represented in the CSV report as either Strings or Integers, value provider beans are necessary if we want to map our custom property and logic and present it in the report. There are examples of some of the current properties that can be analyzed.
Export process
The export process is run automatically, with no action required on your part. The export process is run by the Product Export Job.
If the job finishes successfully, productfeed.csv is created and uploaded to your AWS S3 folder (using the Access Key and Secret Access Key you provided). The bucket name and location are determined automatically, based on other Dynamic Yield Integration parameters (Site ID, Use European Scripts). Additionally, productfeed.csv will be saved on the server in hybris/data/dynamicyieldintegration/export. In both cases, only the latest exported file will be saved.
If something goes wrong in the export process, it will be logged in the console log with the complete message. If the product is not exported because of some empty field, it will be logged in the console log in the form PRODUCT NOT EXPORTED! Product code: %productCode, empty attribute: %propertyName. Only the first empty mandatory property is logged, for performance reasons.
If the file limit is exceeded, the export will finish without error and log the message Builder limit exceeded! Number of appended products %numberOfProducts.
There is also a possible scenario that java heap memory runs out. This happened in a test environment when the product count was over 2200000. In this case, the process will fail, and the log message will be written in the console log. The recommended tomcat.generaloptions setting in the server for stable work should be at least
-Xmx8G.
The period and trigger of the cronjob execution is set automatically, based on the Sync Rate setting in Dynamic Yield Integration. The default is 1 day (every 24h).
If you do not want the cronjob to run automatically, the Sync Rate should be set to n/a (empty value).
Updated 6 months ago