Integrating Your Own CDN
The CDN integration feature allows you to serve Experience OS assets (and optionally, images that you upload through our system) from your own CDN as opposed to Experience OS. This means that:
- Your site doesn't have an additional external dependency.
- You can select the CDN vendor, to both comply with your current contract with your CDN and to make sure that there are servers as close to your visitors as possible.
- Your servers can optimize loading time, as they have full control.
CDN integrations are not supported if you implemented Experience OS via Salesforce.
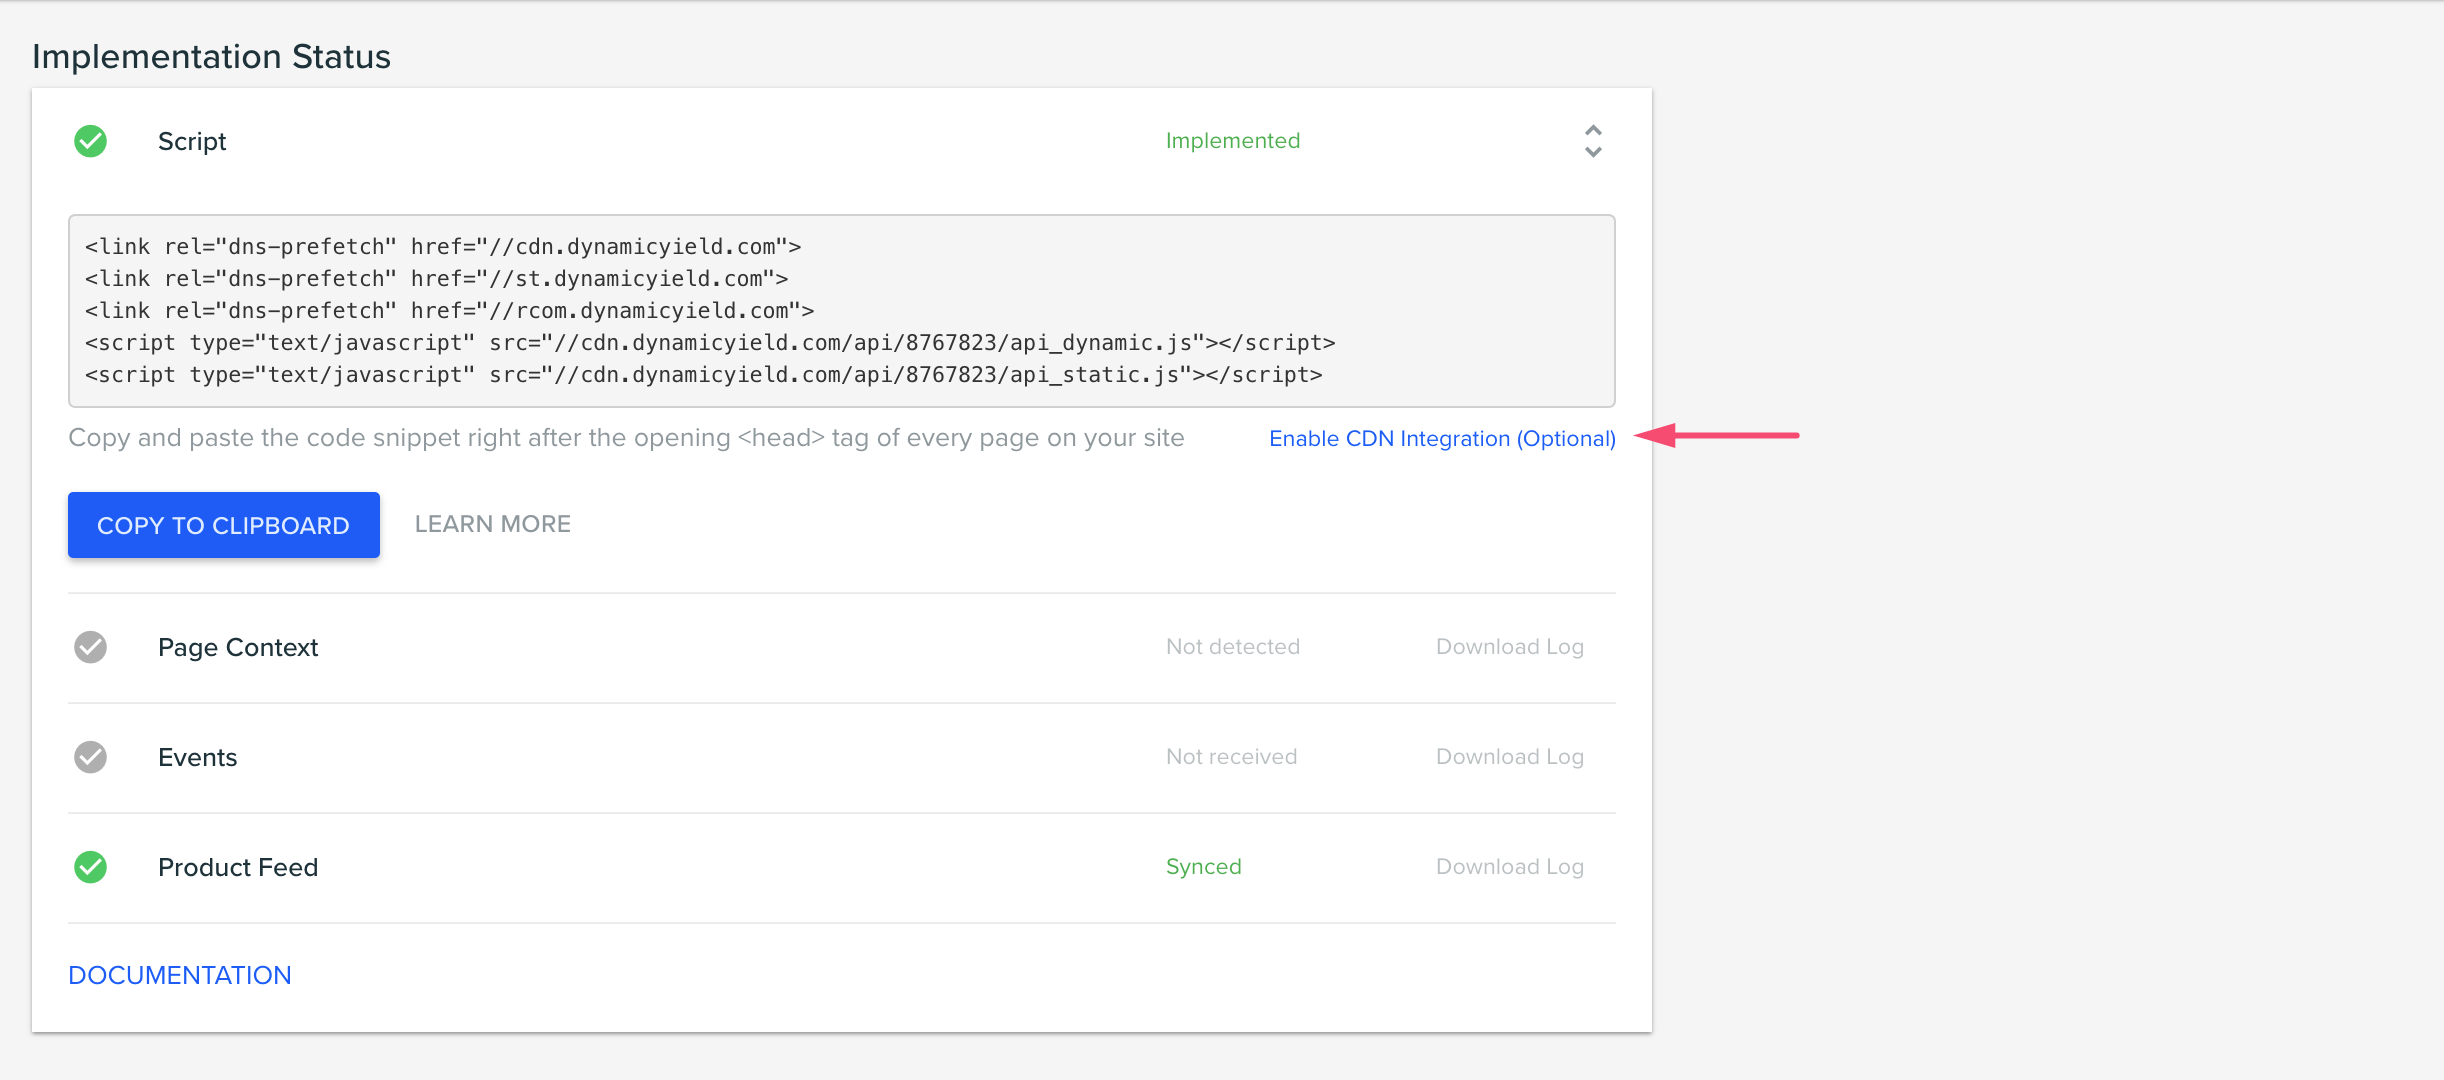
Configure the CDN settings
-
Go to Settings › General Settings. Under the Dynamic Yield script, click Enable CDN Integration. Note: If our script has been implemented, click the script status or the code icon to reveal the link).
-
Choose an upload method:
- FTP-Passive-mode
- SSH-based SFTP
- explicit-SSL passive-mode FTPS
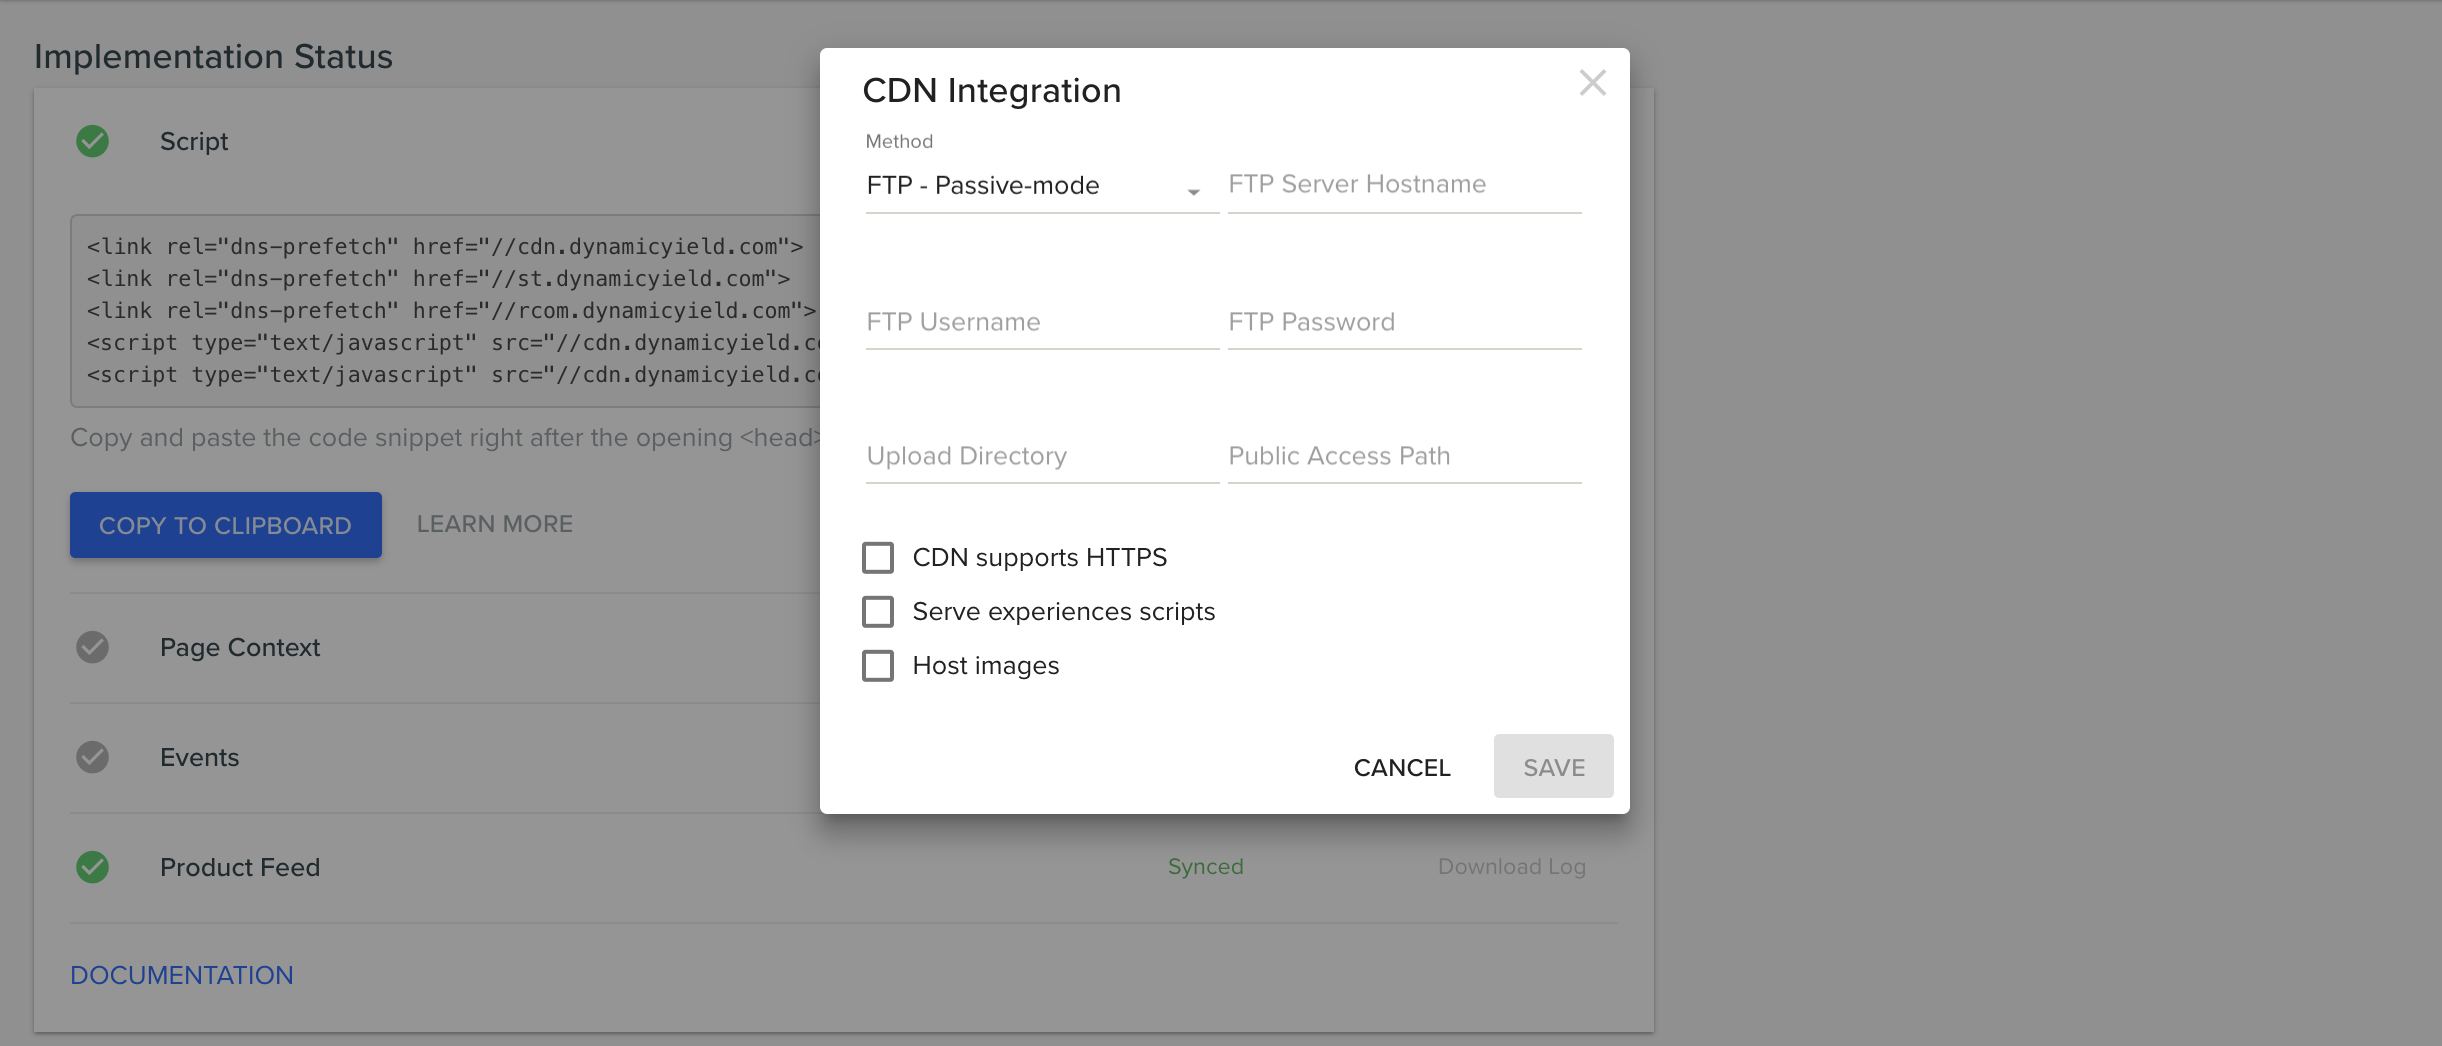
- Enter the hostname, username, and password used by the upload process.
- Configure the Upload Directory (after the username is FTP-authorized, the directory will be used for the upload).
- Configure the public path.
- Select CDN supports HTTPS only if your CDN actually permits it.
- Save your configurations.
- Test your configuration by clicking the additional actions icon actions_icon.png to reveal the options menu.
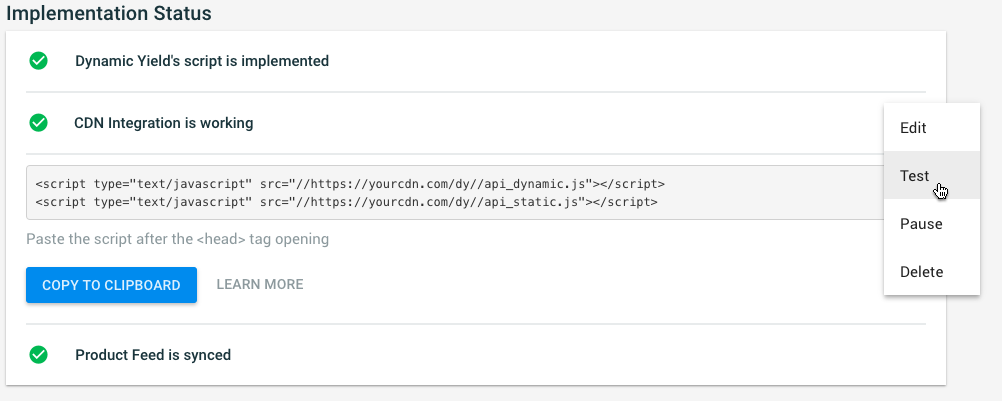
The configuration is activated only upon receiving a successful test confirmation. You can pause or delete the CDN configuration at any time.
We recommend that you perform the following steps:
- Set the Upload Directory to api/[section-id]/.
- Create a directory on your server named api/[section-id]/images.
- Activate Serving compressed JavaScript resources.
- In Upload Dir > api.js, set 5-minute expiration for api_dynamic.js.
- in Upload Dir > api_static.js, set 8 hour expiration.
- in Upload Dir > images, set expiration for all resources (the recommended period is one year or longer).
- Set FTP/FTPS/SFTP as open to only the following IPs:
| US data center sections | EU data center sections |
|---|---|
| 3.92.38.28 3.227.221.249 54.145.37.112 75.101.154.167 52.206.34.55 | 18.197.234.165 3.127.189.219 18.158.108.19 18.192.189.87 18.195.163.252 |
Configure usage of hosted CDN by Dynamic Yield-generated iframe
After you configure the CDN settings and activate the hosted CDN, you can serve API scripts for the CDN of your choice. API scripts continue to be served and available on Akamai.
When serving iframes for Smarts, a URL to api_script.js is generated by Dynamic Yield. By default, we use our Akamai resources.
- Set Public Path as web access path to served resources. Map it to the hostname.
- Select Serve experiment scripts.
Configure image hosting by external CDN
Images used in Smarts features are hosted by default on Akamai. If you configure uploading to a client-hosted CDN, Public Path is set, and Host images is selected, then the client-hosted CDN can be used to store images and serve them when Dynamic Content campaigns are rendered. Note that a folder named “images” must be set up on the client-side CDN for the images to upload and render properly.
A decision on whether to use Akamai or client-hosted CDN for Smarts features is made upon uploading the image in the Dynamic Yield console (and not on a per-render basis).
After everything is configured, the Dynamic Yield script on your site must be adjusted so its links point to your new CDN.
- For most implementations, use the following example and make sure to adjust the red text to point to your CDN:
<script type="text/javascript" src="//INSERT YOUR CDN DATA HERE/api_dynamic.js"></script> <script type="text/javascript" src="//INSERT YOUR CDN DATA HERE/api_static.js"></script> - If you implemented Experience OS via Magento, adjust your script directly in Magento as described in the implementation procedures.
It's important to verify that your scripts are loading correctly by clicking the new source link and confirming that you're receiving the same result as if clicking on the original link.
Updated 6 months ago