Magento 2.x
The Dynamic Yield Magento implementation provides quick and seamless integration with Dynamic Yield and enables automatic implementation of the Dynamic Yield e-commerce solution that includes:
- Dynamic Yield tracking script implementation
- Context API implementation
- e-commerce events implementation
- Product feed (catalog) export
The Magento implementation is compatible with both the Enterprise and Community editions, and supports the following event types:
- Purchase
- Add to cart
- Signup
- Login
- Newsletter subscription
- Add to wishlist
- Remove from cart
- Sort items
- Filter items
- Change attribute
- Promo code entered
- Search
Note:Bundled products are not supported and will not be migrated to Dynamic Yield.
Integration requirements
The following are assumed true regarding your Magento environment for the integration. If any of the following assumptions are false, speak to your Customer Success Manager to determine whether this implementation method is supported for your environment.
- Your Magento site is based on a single data feed that will map to one Dynamic Yield section. The section can manage one storefront or multiple translations of the same storefront.
If you have multiple store views of any type other than a translation of the same store, create a section and product feed for each one, and then sync them manually. - There are fewer than 150,000 products in your product feed. If you have more than that, disable the feed synchronization in Magento and sync the feed manually.
- The store theme has not been heavily customized in a way that would make the DOM element data difficult to access using JavaScript.
- The Magento core code has not been modified directly or extended incorrectly.
- If you manage stock availability per locale using a plugin in Magento, you must sync your feed manually.
Mapping store views to Dynamic Yield sections
The following are the steps you must complete to map your store views to Dynamic Yield:
Step 1: Create your section in Experience OS
A section in Dynamic Yield Experience OS represents your store's site in our system. Each section has an associated product feed, which is your product catalog. You'll configure the sync of the catalog/feed in the following steps.
To create the section, go to Experience OS and follow the directions in Managing Sections.
Step 2: Create your product feed file and sync to Dynamic Yield
The product feed is a file that contains your product catalog (all your products, with product metadata). First, you must first create a file to upload to an AWS S3 bucket, to sync with the Dynamic Yield product feed. A synced product feed enables capabilities like recommendations, segmenting based on product engagement, social proof tactics, and more. Then, you must create your S3 bucket in Experience OS and generate credentials.
To enable the sync, you must enter the AWS S3 access and secret keys in the Configuration step.
Step 3: Configure the Dynamic Yield Site ID in your Magento admin panel
This step is part of the Configuration procedure described later in this article. It's important that you copy your Site ID from Dynamic Yield to complete this step.
Installing the Magento integration
-
Go to the Magento 2 root in a command prompt and enter the following command:
cd <magento2-root> -
Download and extract the installation files into the root folter, using the following folder structure:
<magento2-root>/packages/DynamicYield/Integration -
Modify your project composer.json file and include the integration module under
repositoriesandrequireas follows:"repositories": [ ... Any existing repositories { "type": "path", "url": "./packages/DynamicYield/Integration", "options": { "symlink": true } } ], ... Rest of the configuration "require": { ... Any existing modules "dynamic-yield/integration": "@dev" }Then run the command composer update to install the module.
-
Switch to Magento 2 bin directory, so you can enable the extension as follows:
cd bin/ -
Make sure that the module has been successfully required by the composer by typing the following commands in the command prompt:
php magento module:statusThis should return the following:
List of disabled modules: DynamicYield_Integration -
Enable maintenance mode by typing the following commands in the command prompt:
php magento maintenance:enable php magento cache:clean -
Enable the module by typing the following command in the command prompt:
php magento module:enable DynamicYield_IntegrationYou should receive a message indicating the module has been enabled in the command prompt.
-
Make sure that the enabled modules are properly registered by typing the following commands in the command prompt:
php magento setup:upgrade --keep-generated -
Deploy module static view files by typing the following commands in the command prompt:
php magento setup:static-content:deploy -
Flush Magento 2 cache storage, by typing the following commands in the command prompt:
php magento cache:flush -
Disable maintenance mode by typing the following commands in the command prompt:
php magento maintenance:disable -
If you are using a versioning system, such as “Git”, commit these changes to your project repository by typing the following commands in the command prompt:
cd ..
git add composer.json composer.lock && git commit -m "Added dynamic-yield/integration module" && git push
Notes
- If you use Varnish or similar caching solutions, ensure the Dynamic Yield blocks are not cached. In certain cases, hole-punching might be necessary.
- If you're using a custom template and the template uses HTML classes other than the default ones, you must adjust those fields so that the Dynamic Yield integration can work properly, as shown in the Advanced Settings section of this article.
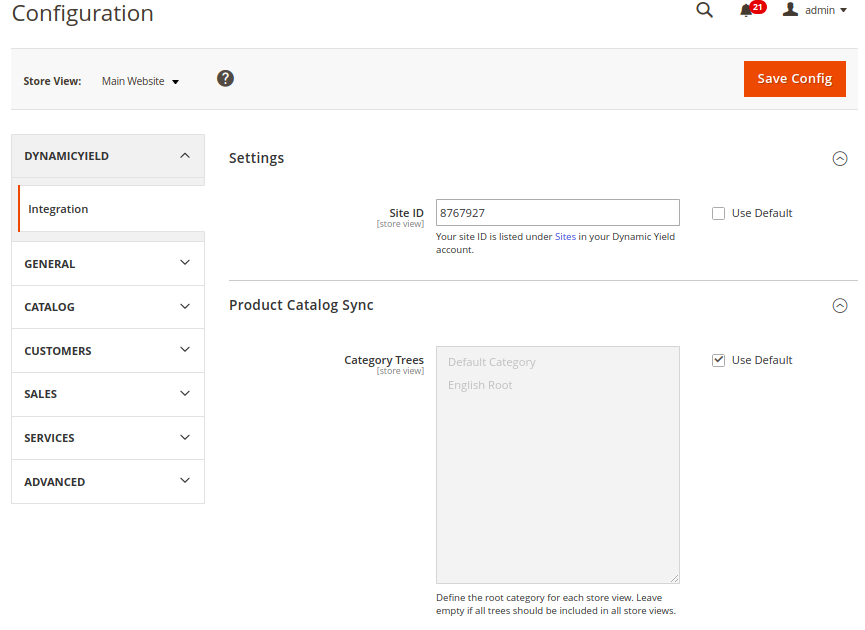
Configuration
Notes
- Site ID is a store view level configuration, which means that it is possible to set different Site ID for each store view.
- If you have multiple Store Views representing anything other than multiple translations of the same store, see the previous section, Mapping store views to Dynamic Yield sections.
- The product feed configurations are global.
- In the Magento admin panel, go to Stores › Configuration.
- Open the Dynamic Yield › Integration section.
- In the Settings section, expand the Site ID section, and then:
- Enter your Dynamic Yield site ID. Make sure Use Default is deselected.
- In the **Access Key ID**, enter the value provided by your Customer Success Manager. This gives the implementation access to your AWS S3 bucket. This configuration is global and therefore affects all stores and store views in this instance of Magento.
- Enter the **Secret Access Key** provided by your Customer Success Manager. This gives the AWS bucket access to the feed storage. This configuration is global and therefore affects all stores and store views in this instance of Magento.
- Expand the Product Catalog Sync section and configure the following fields:
- Enable Product Feed Sync: This should be enabled, unless your feed is not standard and must be manually synchronized (see Integration requirements). If you disable the sync, you don't need to configure any other settings in this step.
- Sync Rate: Export feed. Sync rate configurations determine how often you want the feed to be updated on Dynamic Yield.
- Product Attributes: Enhance your personalization capabilities by syncing up to 10 additional key product attributes (mandatory attributes are already selected). Note that you won't be able to deselect attributes after sync.
- Used Product Attributes: List of selected attributes. To remove an attribute, click it and then click Save.
Note: You should not deselect an attribute after the feed has synced. Contact your account manager for additional information. - Exclude Categories: Categories that will be excluded from the product feed column called “categories”. These categories will be reported in the column “keywords”. This is designed for temporary categories, such as “winter sale”, which do not represent the main category tree but are still valuable. If excluded, these categories will still be reachable via the keywords column.
- Category Trees: Define a root category for each store scope. Leave empty if all trees are included in all store views.
- Debug Mode: Enable product feed debug mode. The logs are written to a file dyi_feed.log.
- Use the Custom Locale section to configure page context for each translated version of your site. For more details, see Validating multi-language sites.
- Expand the Integration Type section and complete the following settings:
- Enable Dynamic Yield Europe Account: Set this field to Yes to enable the Dynamic Yield Europe account. This setting adjusts the tracking script URLs and product feed upload URL. No other configuration is necessary.
- Enable CDN integration: If you select Yes or European, an input field to write your own CDN URL is shown (select Yes). If you select European, the product feed bucket endpoint URL is changed.
- CDN URL: You can write your custom CDN URL that will include the tracking scripts.
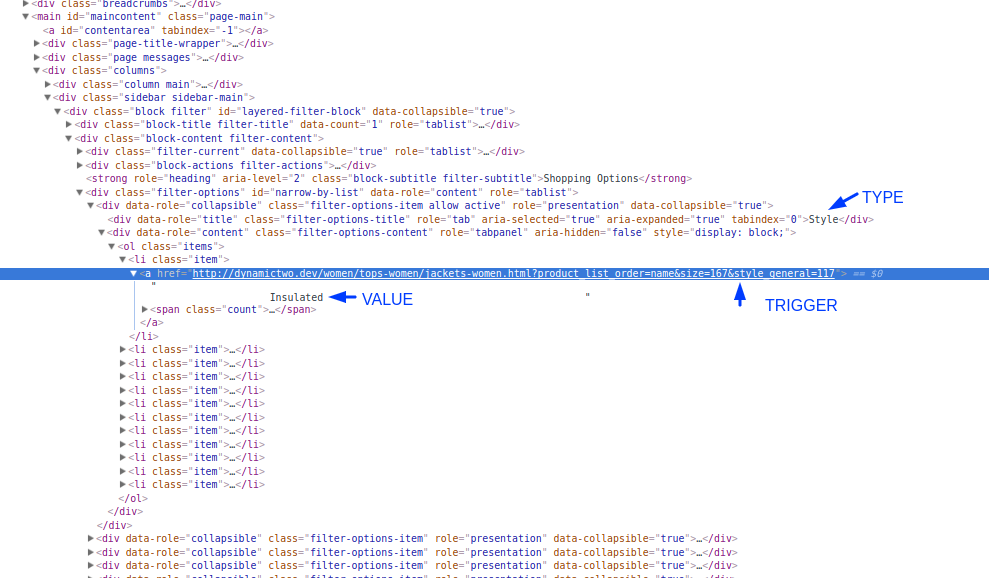
Advanced settings
If you use a custom template that uses HTML classes other than the default ones, you must adjust those fields so that the Dynamic Yield integration can work properly. For Magento versions 2.2 and higher, the Developer tab and options are only available in Developer Mode.
-
Go to System › Configuration › Advanced › Developer in the admin panel.
-
Expand the Dynamic Yield Integration section, and configure the following as needed:
-
Triggers: These configuration values expect a CSS selector (element, class, id) of the element that will trigger the action. An event listener is attached to this element. In case the DOM element is not found the event will not be attached and that particular event will not be tracked. To find the appropriate selector inspect the source code of the page and find the element that is responsible for triggering the filter/sort/change functionality. This can be any element (div/select/a/span). Usually just clicking on the element to inspect source is enough to find it, but sometimes it is more convenient to select the parent or child element.Enable CDN integration: If you select Yes or European, an input field appears where you can enter your CDN URL. (Recommended: Select Yes. If you select European, the product feed bucket endpoint URL changes.)
-
Type and Value: After you find the trigger element, you must next extract 2 values – type and value (filter type: Size, filter value: Green). To extract these you need to configure the Value and Type configuration fields. These fields show the DOM structure relative to the trigger element and are used to extract the type and value data. The structure (Type and Value) configs expect a JSON type string where keys are functions and values are function parameters. Any function that is available in the given scope can be used in the structure.
Here's an example:
-
Filter: Can have multiple types: Attribute, text-based swatch, image-based swatch, and so on. Therefore, there are multiple configuration values for each type. Fill in necessary fields according to your requirements. If you don't use a particular type of filter you can leave the configuration as-is or leave the field empty.
-
Configuration is store scope so it is possible to set different selectors for each store view.
Validation
It's important to validate that your script, page context, data feed, and events have been set up properly. To do this, use the Implementation Status Dashboard and the Web Implementation Helper.
See Validating Your Script Implementation for help with validation.
If you have multiple storefronts representing different translations of your site, see the Validating multi-language sites section of this article. If you have any issues with the Purchase event, see the Troubleshooting purchase events section. If you can't validate your product feed, see the Troubleshooting your product feed section.
Validating multi-language sites
If you have multiple storefronts representing different translations of your site, it's important to validate that the page context is properly aligned for each site. This is in addition to the standard page context validation procedure.
- Go to one of your websites and open the browser console.
- Locate the page context by searching for DY.recommendationContext.
- Verify that the lng parameter is aligned with the language of the page.
- Repeat this procedure for each translated version of your site.
- If you find one or more lng parameters that are not aligned with your site, you can update it in the plugin settings.
- Go to System › Configuration › Advanced › Developer in the admin panel.
- Expand the Dynamic Yield Integration section.
- Set the Enable Custom Locate setting to true and use the dropdown list to select the correct language for the Store View that is currently selected. Repeat for every Store View.
- If the dropdown list does not have the correct language setting, set Set Custom Locate to true and specify the language string in the Custom Context Store Locale field (for example. de_DE).
Troubleshooting purchase events
The integration uses default Magneto events that work with default Luma and built-in modules. So, if you use a third-party payment/checkout module, you need to make sure that these events are triggered (or add observers to your custom events) during place order:
Magento1 – sales_order_place_after
Magento2 – checkout_onepage_controller_success_action
Troubleshooting your product feed
If you can't successfully synchronize your product feed, verify that all required settings are configured before contacting customer support, including verifying that:
- The Enable Product Feed Sync setting is enabled in Magento. For details, see the Mapping store views to Dynamic Yield section.
- The Site ID, Access Key, and Secret Key settings are correct.
- cron is running on your Magento site.
- The feed file is on the server: {magento_root}/var/dyi_export/productfeed.csv
FAQs
Does the integration support Varnish full-page caching?
Yes, the integration works with Varnish full-page caching. If Varnish or a similar caching solution is used, make sure that Dynamic Yield blocks are not cached. In certain cases, hole-punching might be necessary.
If I use a third-party search extension, will the search event work?
In most cases, yes. However, if the search extension doesn't follow the Magento default built-in class hierarchy, contact us to create a custom solution for you.
The Sort event isn't working. What should I do?
If you use a custom template, there might be some issues with the Sort event, as it's strictly for default Magento templates. Contact us to create a custom solution for you.
The Change attribute event isn't working. What should I do?
This integration is designed to work with default Magento functionality. Are you using any third-party extensions for product page attributes? If so, contact us to create a custom solution for you.
One of the listed events isn't working. What should I do?
This integration is designed to do the least possible harm to any other extensions, but in some cases, there might be conflicts that can cause issues for some events or some other functionality. If this is the case, contact us so our support team can evaluate and fix this issue.
I’m getting a message “DynamicYield Integration: Products missing mandatory attributes. Details: dyi_skipped_products.log”:
Products are validated to ensure that all of the mandatory attributes are set. If you receive this message, it means that some products were skipped during the product feed export. The skipped products are listed in the dyi_skipped_products.log.
Updated about 2 months ago